You spent months — maybe years — building your Google rankings. Then you decide to redesign your Webflow site or move to a new domain, and suddenly you’re staring at a traffic graph that’s pointing straight down.
Here’s the good news: a Webflow migration does not have to hurt your SEO. When you follow the right process, you can move your site, redesign your pages, or switch domains without losing your rankings or your leads. This guide walks you through exactly how to do that — step by step.
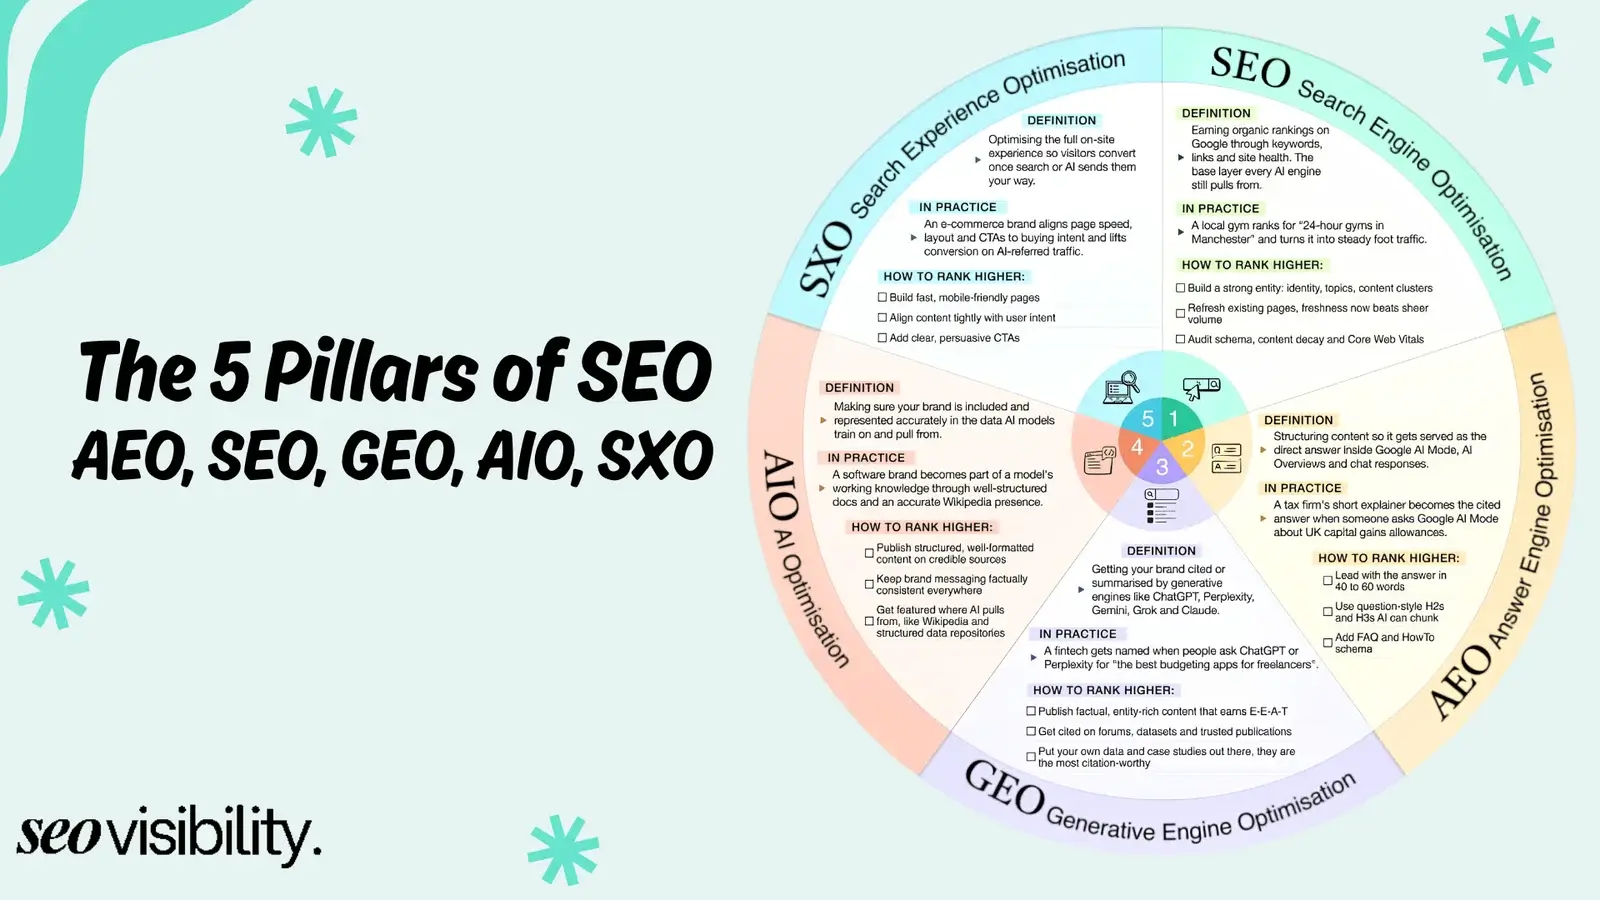
What Is Webflow Migration and Why Does SEO Risk Come With It?
Webflow migration refers to any significant change you make to your Webflow site — this includes moving to a new domain, redesigning your URL structure, switching from another platform to Webflow, or a full site rebuild within Webflow.
Every time Google crawls and indexes your pages, it builds a map of your site. When you change URLs, remove pages, or shift your site structure, Google loses that map. If you don’t rebuild it properly with redirects and updated signals, your rankings drop — sometimes overnight.
The risk is real. Sites that go through a migration without a proper SEO plan can lose 20% to 50% of their organic traffic in the weeks following the move. But that loss is almost always avoidable with the right preparation.
Webflow Migration SEO Checklist at a Glance
This Webflow migration SEO checklist gives you a quick, at‑a‑glance view of every critical task you need to complete before, during, and after your site move. In the sections below, you’ll find a detailed breakdown of each point in the checklist, with clear explanations and practical tips you can follow step by step.
Before Migration:
- Crawl and export all current URLs
- Record current rankings and traffic baseline from Google Search Console
- Identify top-performing pages that need extra care
- Build a redirect map (old URL → new URL)
During Migration:
- Set up all 301 redirects in Webflow (no chains, no blanket homepage redirects)
- Rebuild meta titles, meta descriptions, H1s, and canonical tags on every page
- Fix all internal links and remove broken links
- Verify robots.txt is not blocking important pages
- Check that noindex tags are only on pages you intentionally want excluded
Post Migration:
- Submit updated XML sitemap to Google Search Console
- Use the Change of Address tool if the domain has changed
- Run Core Web Vitals checks on key pages
- Monitor GSC Coverage and Performance weekly for 60–90 days
- Keep the old domain live and redirecting for 6–12 months
Before You Migrate: The Pre-Migration SEO Audit
The most important work in a Webflow SEO migration happens before you touch a single page. Skipping this phase is where most people go wrong.
Crawl and Document Your Existing Site
Use a crawl tool like Screaming Frog or Ahrefs Site Audit to pull a full list of every indexed URL on your current site. Export this as a spreadsheet. You want to capture:
- Every live URL that Google has indexed
- The meta titles and meta descriptions for each page
- H1 headings on each page
- Internal links pointing to each URL
- Canonical tags
- Pages that currently receive organic traffic (pull this from Google Search Console)
This list becomes your migration map. Every URL on it needs to be accounted for in your new site — either kept, redirected, or intentionally removed with a plan.
Pull Your Top-Performing Pages from Google Search Console
Open Google Search Console and filter your pages by clicks over the last 3 to 6 months. Sort from highest to lowest. The pages at the top of that list are your most valuable SEO assets. These pages must be treated with extra care during the migration. If their URLs change, they need proper 301 redirects. If their content changes significantly, you need to make sure the new version still targets the same keywords.
Record Your Current Rankings and Traffic Baseline
Before you launch any changes, take a full snapshot of your current state. Export your keyword rankings and organic traffic data from Google Search Console and your rank tracking tool. This gives you a before picture so you can measure the impact of the migration afterward and spot any problems quickly.
Step 1: Map Every Old URL to a New URL
Once you have your full URL inventory, create a redirect map. This is a simple spreadsheet with two columns: the old URL and the new URL it should point to.
For every page that is changing its URL, you need a 301 redirect. A 301 redirect tells Google that a page has permanently moved to a new location and passes the ranking authority of the old page to the new one.
If a page is staying at the same URL with no changes, great — no redirect needed. If a page is being removed entirely and has no equivalent, consider whether you can consolidate its content into another page or simply let it return a 404. However, any removed page that had meaningful traffic or backlinks should be redirected to the most relevant page on your new site.
Step 2: Set Up 301 Redirects in Webflow
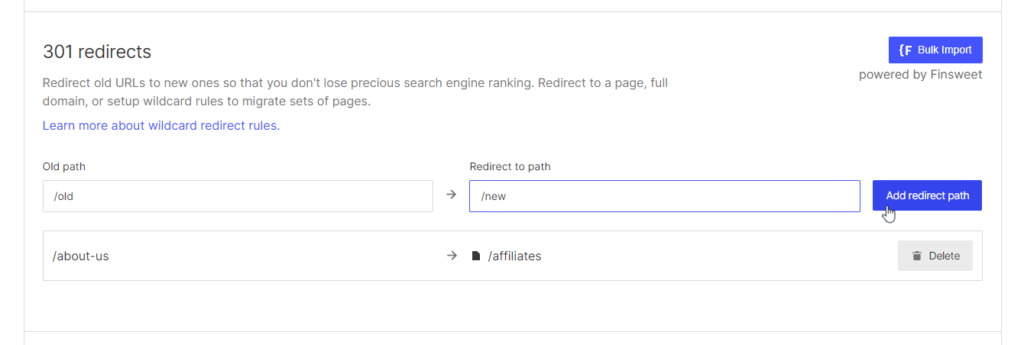
Webflow makes setting up redirects straightforward from within the dashboard. Here is how to do it:
- Go to your Webflow Project Settings
- Click on the Hosting tab
- Scroll down to the 301 Redirects section
- Add each redirect by entering the old path in the “Old Path” field and the new path in the “Redirect to Path” field
- Click Save and then publish your site
A few important rules to follow when setting up your redirects:
- Use exact paths, not full URLs. For example, use /old-page, not https://yourdomain.com/old-page
- Avoid redirect chains. If page A redirects to page B, and page B now redirects to page C, that’s a chain. Google has to follow each step, which dilutes ranking signals. Always redirect directly to the final destination
- Do not redirect everything to the homepage. This is one of the most damaging mistakes in a webflow migration without losing traffic. Google sees it as a soft 404 and will ignore the redirect entirely
- Test every redirect before you go live using a tool like Redirect Checker or httpstatus.io
Step 3: Rebuild Your On-Page SEO Elements in Webflow
When you migrate to a redesigned version of your site, it’s easy to accidentally delete or overwrite the SEO elements that helped your pages rank in the first place. Go through every important page and verify that the following elements are correctly set up in Webflow:
| SEO Element | What to Check | Where to Set It in Webflow |
|---|---|---|
| Meta Title | Matches your target keyword, under 60 characters | Page Settings > SEO Title |
| Meta Description | Compelling, includes keyword, under 155 characters | Page Settings > Meta Description |
| H1 Tag | One per page, includes primary keyword | Add H1 heading block in Designer |
| Canonical Tag | Points to the correct URL | Page Settings > Canonical Tag |
| Alt Text on Images | Descriptive and keyword-relevant where natural | Image Settings in Designer |
| Open Graph Tags | Correct title, description, and image for social sharing | Page Settings > Open Graph |
| Noindex Tag | Only on pages you don’t want indexed (thank you pages, etc.) | Page Settings > Exclude from Search |
Check every page against this list before you go live. Missing or duplicate meta titles and missing canonical tags are among the most common causes of ranking drops after a migration.
Step 4: Audit and Preserve Your Internal Linking Structure
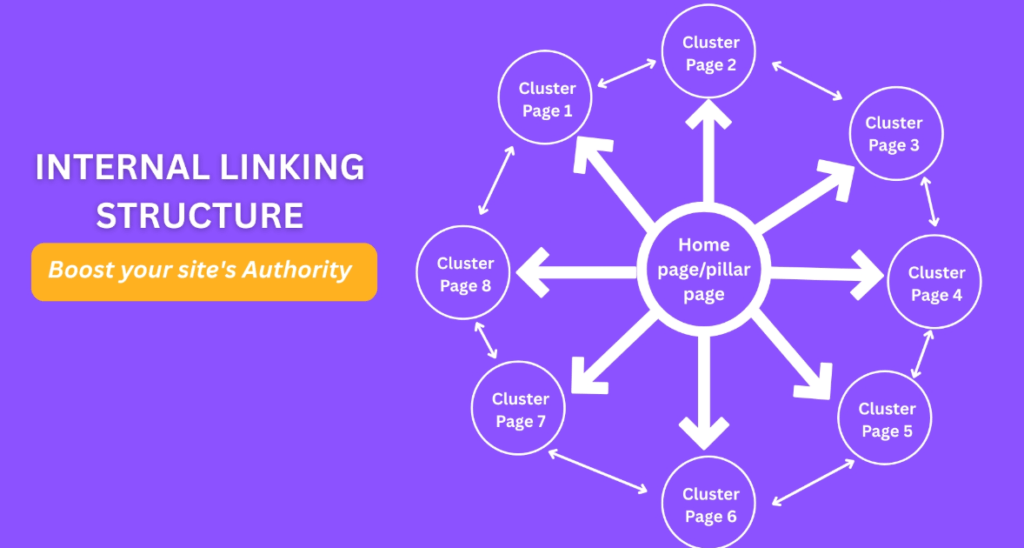
Internal links do two things for SEO: they help Google crawl and discover your pages, and they pass authority from high-value pages to others. During a redesign or migration, internal links often get broken or deleted without anyone realizing it.
After setting up your new site in Webflow, run a crawl to check for broken internal links. Any link pointing to a URL that no longer exists will return a 404 error. Fix these by updating the link to point to the new URL or the redirect destination.
Also check that your most important pages — your main service pages, product pages, or pillar content — are still receiving internal links from other pages on your site. If a page loses its internal links after a migration, Google will crawl it less frequently, and it may lose rankings even if the content and URL stay the same.
Step 5: Generate and Submit a Fresh XML Sitemap
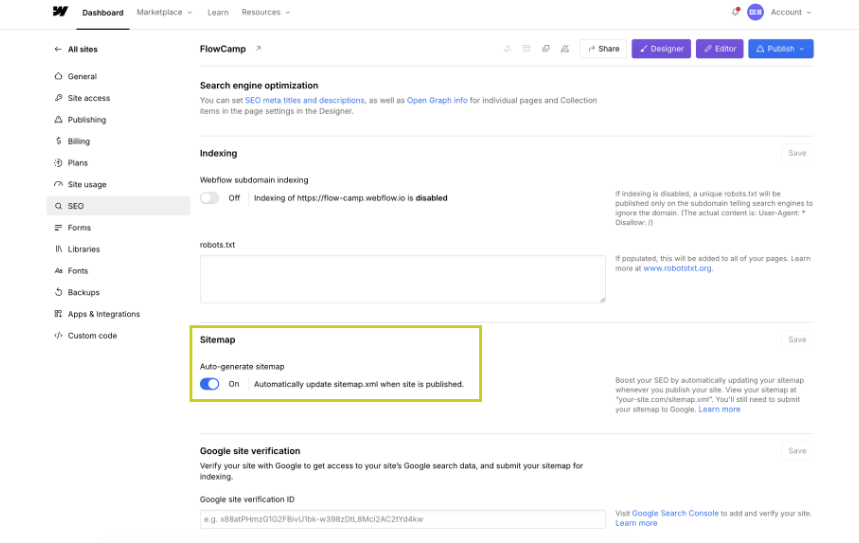
Webflow automatically generates an XML sitemap for your site at yourdomain.com/sitemap.xml. This sitemap tells Google which pages exist on your site and helps it discover and index them faster.
After your migration goes live, submit your sitemap to Google Search Console:
- Log in to Google Search Console
- Select your property
- Go to Sitemaps in the left menu
- Enter your sitemap URL (yourdomain.com/sitemap.xml) and click Submit
Make sure your sitemap only includes pages you want indexed. Remove any noindex pages, thank-you pages, or duplicate pages from being included. In Webflow, pages marked as “Exclude from Search” are automatically excluded from the sitemap.
Step 6: Set Up and Verify Google Search Console for Your New Domain
If your Webflow migration involves a domain change — moving from an old domain to a new one — you need to set up your new domain in Google Search Console and use the Change of Address tool.
Here’s the process:
- Add your new domain as a property in Google Search Console and verify ownership. Webflow supports verification via DNS TXT record, which you can add through your domain registrar.
- Set your preferred domain (www vs. non-www) in Webflow under Project Settings > Publishing.
- Use the Change of Address tool in Google Search Console (under Settings > Change of Address). This signals to Google that your site has officially moved and speeds up the transition of rankings to your new domain.
- Keep your old domain live and redirecting for at least 6 to 12 months after the migration. This gives Google plenty of time to update its index and ensures any backlinks pointing to old URLs continue to pass value.
Step 7: Verify Core Web Vitals and Page Speed After Migration
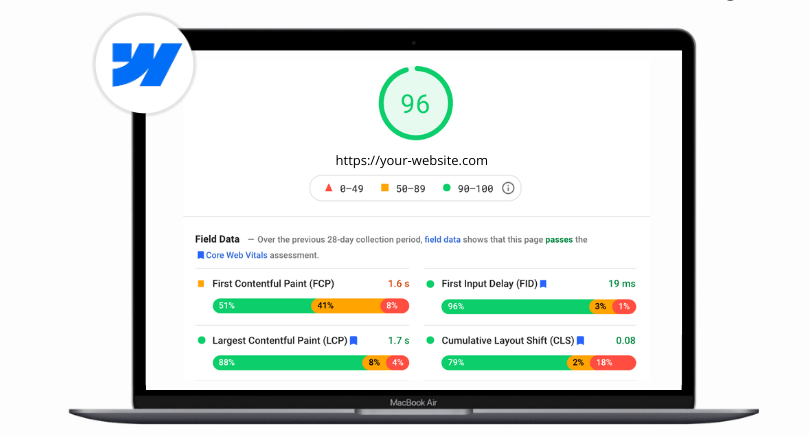
One of the genuine advantages of Webflow is that it produces clean, optimized code out of the box. But a redesign can still introduce performance issues — heavy images, too many custom scripts, or unoptimized fonts — that hurt your Core Web Vitals scores.
Core Web Vitals are a direct Google ranking factor. After your migration, run your key pages through Google PageSpeed Insights and check your scores for:
- Largest Contentful Paint (LCP): Should be under 2.5 seconds
- Cumulative Layout Shift (CLS): Should be under 0.1
- Interaction to Next Paint (INP): Should be under 200 milliseconds
In Webflow, the most common fixes for Core Web Vitals issues include compressing and converting images to WebP format, enabling lazy loading on images, minimizing third-party scripts, and using system fonts or preloading custom fonts properly.
Step 8: Monitor Rankings and Traffic After Go-Live
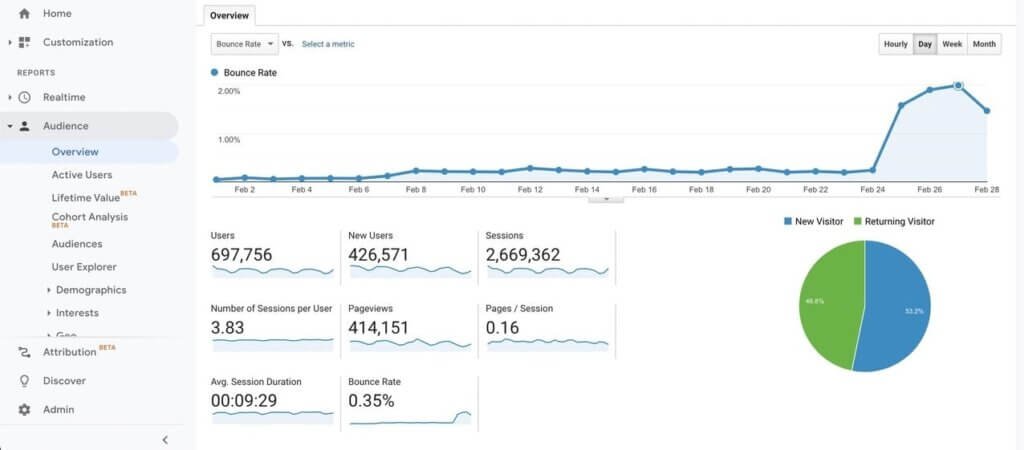
Going live is not the finish line — it’s the beginning of the monitoring phase. Set up a consistent monitoring routine for the first 60 to 90 days after your Webflow migration.
Check the following weekly:
- Google Search Console > Coverage: Look for any new crawl errors, 404 pages, or pages that have been removed from Google’s index unexpectedly
- Google Search Console > Performance: Monitor clicks and impressions for your top pages. A temporary dip of 5% to 15% in the first few weeks is normal as Google re-crawls and re-evaluates your site. A sustained drop beyond that needs investigation
- Rank Tracker: Monitor your target keywords to spot any pages that have lost significant rankings
- Google Analytics / GA4: Watch your organic traffic trend week over week
If you see a sharp drop in a specific page’s rankings, the first things to check are: Did the URL change without a proper redirect? Was the meta title or content significantly altered? Is the page returning a 200 status code? Is it included in the sitemap and not accidentally noindexed?
How Long Does It Take to Recover After a Webflow Migration?
This is the question everyone asks, and the honest answer is: it depends on the size of your site and the scope of your changes.
For a clean migration with proper redirects and no major content changes, most sites see rankings stabilize within 2 to 4 weeks. For larger sites or migrations involving domain changes, Google can take anywhere from 6 weeks to 3 months to fully process all the changes and update its index accordingly.
The key factor is preparation. Sites that do the pre-migration audit, set up all redirects correctly, and monitor actively after launch almost always come through with their rankings intact or even improved. Sites that skip the preparation phase are the ones that end up asking why their traffic collapsed.
Migrate Your Webflow Site Seamlessly and Maintain SEO, Ranking, and Traffic
A Webflow migration is not something to rush through on a Friday afternoon. But when you approach it with a clear plan — auditing first, mapping every URL, setting up clean 301 redirects, and monitoring closely after launch — it doesn’t have to cost you a single ranking.
The businesses that lose traffic during site migrations almost always skipped one of the steps in this guide. The ones that come through without a scratch (or even see improvements) are the ones who treated the migration as an SEO project, not just a design project.
If you want expert help managing your Webflow migration without the risk of traffic loss, at SEO Visibility, Khalid Hussain has spent 15+ years migrating hundreds of Webflow websites while protecting and maintaining the organic traffic through site migrations, redesigns, and platform moves.
Book a free consultation today to plan your Webflow site migration seamlessly!


![How Much Does an SEO Expert Cost in 2026 [SEO Pricing]](https://seovisibility.co/wp-content/uploads/2026/01/how-much-does-an-seo-expert-cost.png)


![SEO Copywriting Checklist [Easy to Follow Guidelines]](https://seovisibility.co/wp-content/uploads/2026/01/seo-copywriting-checklist.png)